Optimizing image processing in Rust with SIMD intrinsics
Single instruction, multiple data (SIMD) intrinsics allow us to vectorize operations that would otherwise occur sequentially. This can greatly speed up a series of simple, repetitive operations that might be normally executed using loops. In this article, we will focus on vectorizable operations commonly found in image processing.
Adjusting image brightness
Let’s say we want to write a function that increases the brightness of an image. We can do that by simply adding a value to each channel in the image. For simplicity, we assume that our image has already been processed into a vector for us.
Here is that function, which takes in the image as a Vec of u8’s and another u8, which is a value from 0-255 indicating how much we want to increase the brightness of the image by:
fn add(input: &Vec<u8>, val: u8) -> Vec<u8> {
    let mut output: Vec<u8> = Vec::with_capacity(input.len());

    for i in input {
        output.push(i + val);
    }

    return output
}
That was pretty straightforward. Now let’s do the same thing again, except this time we’ll do it using SIMD intrinsics, specifically, using AVX2 instructions.
#[cfg(any(target_arch = "x86", target_arch = "x86_64"))]
#[target_feature(enable = "avx2")]
unsafe fn add_256(input: &Vec<u8>, val: u8) -> Vec<u8> {
    #[cfg(target_arch = "x86_64")]
    use std::arch::x86_64::*;

    #[cfg(target_arch = "x86")]
    use std::arch::x86::*;

    let mut output: Vec<u8> = vec![0; input.len()];
    let val_256 = _mm256_set1_epi8(val as i8);

    let mut i = 0;
    while (i + 32) <= input.len() {
        let chunk = _mm256_loadu_si256(input.as_ptr().offset(i as isize) as *const _);
        let res = _mm256_adds_epi8(chunk, val_256);
        _mm256_storeu_si256(output.as_mut_ptr().offset(i as isize) as *mut _, res);

        i += 32;
    }

    return output
}
Let’s break this down.
The #[cfg] attribute lets us only compile this function on x86/x86_64, and the #[target_feature] attribute lets us enable the avx2 feature only for this function.
#[cfg(any(target_arch = "x86", target_arch = "x86_64"))]
#[target_feature(enable = "avx2")]
Here we use the relevant arch module for our machine.
#[cfg(target_arch = "x86_64")]
use std::arch::x86_64::*;

#[cfg(target_arch = "x86")]
use std::arch::x86::*;
We create our output vector, which should be the same length as our input vector, and populate it with zeroes.
let mut output: Vec<u8> = vec![0; input.len()];
We load val into all 8-bit elements of a 256-bit SIMD register using _mm256_set1_epi8.
let val_256 = _mm256_set1_epi8(val as i8);
Since we are using 256-bit SIMD registers, we can iterate through our input vector 32 bytes at a time, keeping track of our current position within the vector with a counter variable, i.
Each iteration, we load the next 32 bytes of input into a 256-bit SIMD register using _mm256_loadu_si256, which takes in a pointer to the address of the data.
let chunk = _mm256_loadu_si256(input.as_ptr().offset(i as isize) as *const _);
Then, we add our two SIMD registers together with a single instruction using _mm256_adds_epi8. We are adding using saturation here, which means that the result will be clamped to fit within an 8-bit integer.
let res = _mm256_adds_epi8(chunk, val_256);
Finally, we store the result using _mm256_storeu_si256, which takes in a pointer to the address of where we want to store the data, and the SIMD register containing the data we want to store.
_mm256_storeu_si256(output.as_mut_ptr().offset(i as isize) as *mut _, res);
Once we’ve iterated through the entire input vector, we should have added val to each of its elements, and produced the correct output vector!
Benchmarks
So how do these two functions actually compare? Let’s use criterion to compare the performance of the two functions across a range of image sizes.
fn bench_add(c: &mut Criterion) {
    static KB: usize = 1024;

    let mut group = c.benchmark_group("Add 10");
    for size in [KB, 16 * KB, 32 * KB, 64 * KB, 128 * KB].iter() {
        group.throughput(Throughput::Bytes(*size as u64));
        group.bench_with_input(BenchmarkId::new("No SIMD", size), size, |b, &size| {
            b.iter(|| add(&vec![10; size], 10))
        });
        group.bench_with_input(BenchmarkId::new("SIMD", size), size, |b, &size| {
            b.iter(|| unsafe { add_256(&vec![10; size], 10) })
        });
    }
}
Speed
Size (bytes) |
1024 |
16384 |
32768 |
65536 |
131072 |
|---|---|---|---|---|---|
| No SIMD | 1.99 us | 31.7 us | 33.6 us | 94.2 us | 134 us |
| SIMD | 82.8 ns | 623 ns | 1.48 us | 2.73 us | 5.23 us |
| SIMD Comparison | 24x faster | 51x faster | 23x faster | 35x faster | 26x faster |
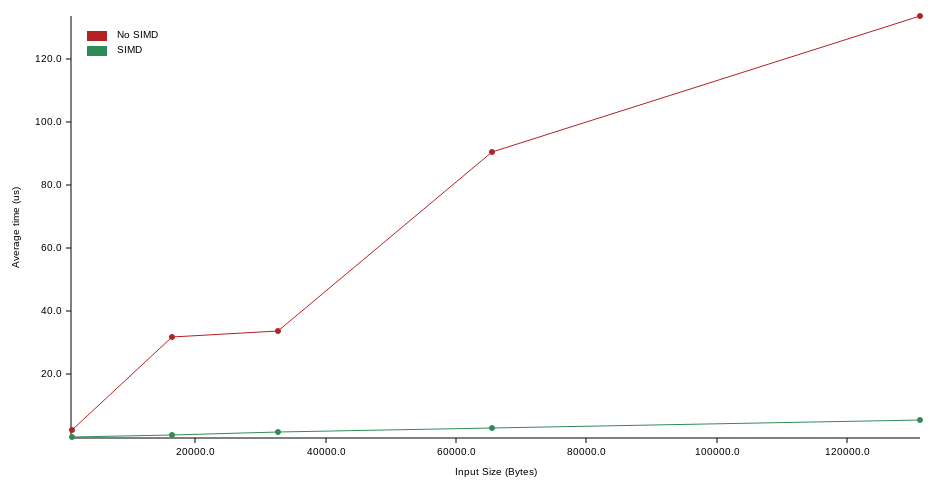
As you can see, the SIMD version is not only significantly faster, but also grows at a significantly slower rate as the input size increases.
Throughput
Size (bytes) |
1024 |
16384 |
32768 |
65536 |
131072 |
|---|---|---|---|---|---|
| No SIMD | 490 MiB/s | 493 MiB/s | 930 MiB/s | 663 MiB/s | 933 MiB/s |
| SIMD | 11.5 GiB/s | 24.5 GiB/s | 20.6 GiB/s | 22.3 GiB/s | 23.3 GiB/s |
As expected, we are also able to process significantly more bytes per second with SIMD (1 GiB = 1024 MiB).
What about images with an alpha channel?
In some cases, we would like to only change the values of particular channels within our image. For instance, we might want to change only the saturation channel in an HSV image, or change only the RGB channels of RGBA image.
In our case, if our input vector represents an RGBA image, then we would like to add val to all channels except the 4th channel, which is the alpha channel. This will increase the brightness of the image while preserving the level of transparency.
We can use _mm256_blendv_epi8 to create a masked SIMD register, which will contain val for the elements corresponding to the RGB elements in the input, and 0 for the elements corresponding to the alpha channel. This would look something like: {val, val, val, 0, val, val, val, 0, ...}.
Since our RGBA image happens to have 4 channels, making each pixel 4 bytes, we can conveniently fit exactly 8 pixels into each 256-bit SIMD register, allowing us to re-use the same masked SIMD register for each 32-byte chunk.
First, we need a mask. If you take a look at Intel's documentation for _mm256_blendv_epi8, you’ll see that only the highest bit of each 8-bit element needs to be set in the mask to have an effect on its corresponding element. So, for a 4-byte pixel, the mask would be entirely zeroes except for the highest bit. Since this value is in two’s complement form, with the highest bit representing the sign bit, the value we pass it should be negative. It turns out that the correct value can be represented as -80000000 in hex. We’ll use this value to generate a mask for all the pixels in the 256-bit register:
let mask = _mm256_set1_epi32(-0x80000000);
Then, we need two registers to “blend”. We’ll use the val_256 register we previously created, and another register full of zeroes, which we can create with the following:
let zeroes_256 = _mm256_setzero_si256();
Finally, we create the desired masked register:
let val_masked = _mm256_blendv_epi8(zeroes_256, val_256, mask);
And instead of adding val_256 to each 32-byte chunk of our input vector, we now add our masked register:
let res = _mm256_adds_epi8(chunk, val_masked);
Voila! Now, we have an optimized way to increase the brightness on both non-alpha and alpha images.
Implementation Notes
1. Calling functions that use SIMD intrinsics
One disadvantage of using SIMD intrinsics is that they are platform-specific. If you are writing functions that other people may use, you’ll want to include a fallback version that will run on all platforms. This can be accomplished using the is_x86_feature_detected! macro, which will detect if the specified feature is supported at runtime. This way, the function will work on any machine, but will use our optimized version wherever it is supported.
In our case, we can use our initial add implementation as our fallback function.
fn add_fn(input: &Vec<u8>, val: u8) -> Vec<u8> {
    #[cfg(any(target_arch = "x86", target_arch = "x86_64"))]
    {
        if is_x86_feature_detected!("avx2") {
            return unsafe { add_256(input, val) }
        }
    }

    // Fallback function
    return add(input, val)
}
2. Leftover data
Not all images will be perfectly divisible by 32 bytes. If there are any bytes left over at the end, we can simply process them sequentially, as there will be no more than 31 bytes to process.
if i > input.len() {
    for j in (i - 32)..input.len() {
        output[j] = input[j].saturating_add(val);
    }
}
I hope you found this helpful, and thanks for reading!
Additional resources
- SIMD module from imgproc-rs
- Rust's SIMD module
- Rust's Portable SIMD module (nightly-only)
- Intel Intrinsics Guide